Navigation and Routing in Flutter App
Posted on June 17, 2020 in Navigation
Target Audience: Beginner
Recipe: Implement Navigation from one page to another page using three different techniques.
Focus Widget: Navigator Widget
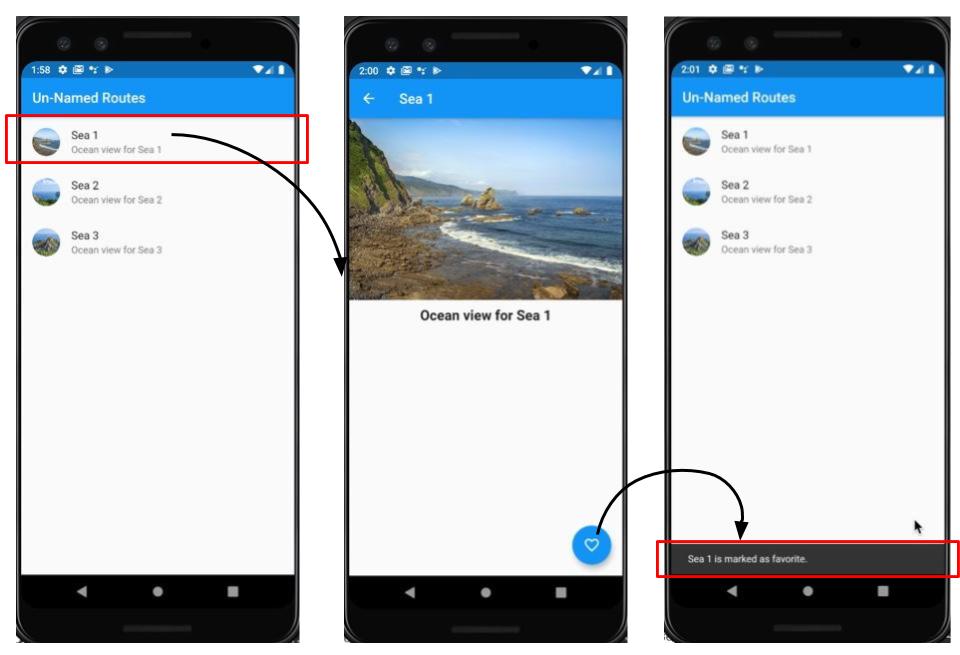
Goals: We'll implement navigation from homepage's list item to its detailed view. In this recipe, we'll do two things:
-
User Interface:: Create a homepage,
PageListing- consists of three items. Another page,PageDetailsto display details for each item. Clicking on an item inPageListingpage, will open the detailed view -PageDetailsfor that item. -
Navigation: Implement navigation from PageListing (homepage) to PageDetails (details page) in three different ways.
-
Sending data: Sending data from PageListing to PageDetails page. The
Itemobject is passed along to target page. -
Receiving data: Receiving data from PageDetails page.
Navigator.pop()is used to send text from PageDetails to PageListing page.
Checkout the YouTube video tutorial:
Building Interface
First, we'll build two pages to navigate from one to another. The First page is called PageListing page/screen. The second page is PageDetails page/screen.
PageListing Screen
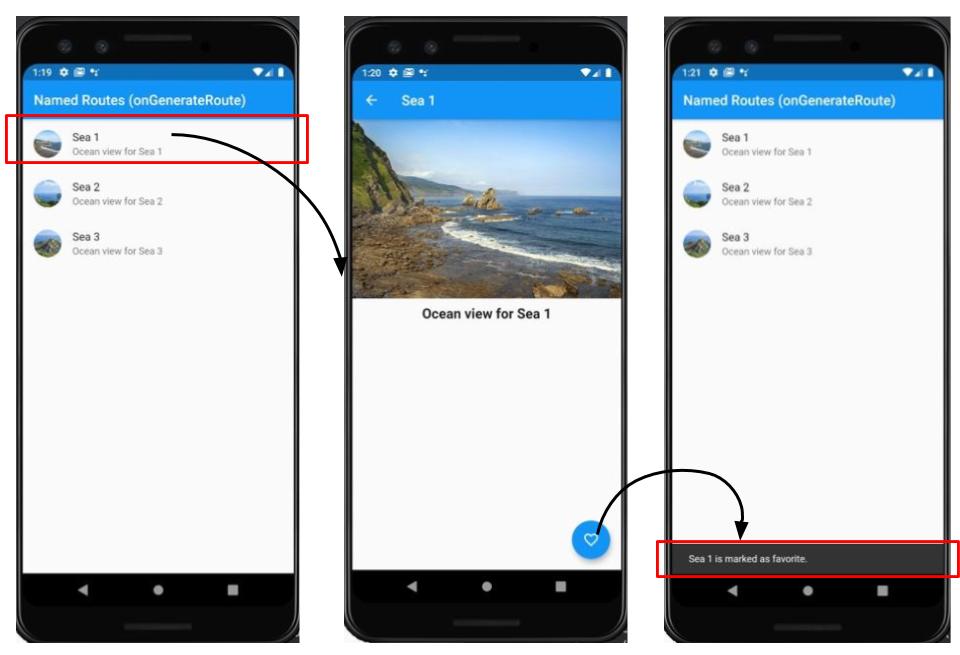
The PageListing is a StatelessWidget. This the homepage of this sample app. It consists of three list items. Each item has a picture and sample title and subtitle as shown in the screenshot below. The appBar shows the name of the navigation/routing used.
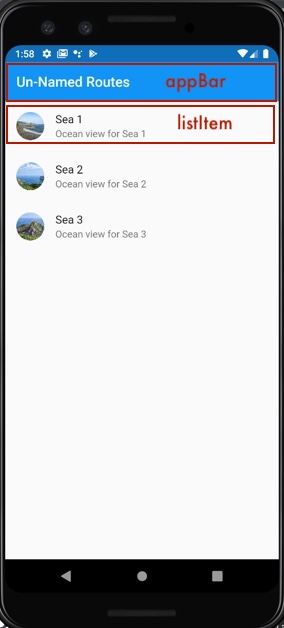
The items are stored in a global List<Item> seasideList.
List<Item> seasideList = [
  Item(
      name: 'Sea 1',
      image: 'assets/images/sea2.jpg',
      details: "Ocean view for Sea 1"),
  Item(
      name: 'Sea 2',
      image: 'assets/images/sea3.jpg',
      details: "Ocean view for Sea 2"),
  Item(
      name: 'Sea 3',
      image: 'assets/images/sea-rocks.jpg',
      details: "Ocean view for Sea 3")
];
The PageListing implementation:
class PageListing extends StatelessWidget {
  @override
  Widget build(BuildContext context) {
    return Scaffold(
      //Shows the name of navigation type/routing used
      appBar: AppBar(
        title: Text('Un-Named Routes'),
      ),
      body: ListView.builder(
          itemCount: seasideList != null ? seasideList.length : 0,
          itemBuilder: (BuildContext context, int index) {
            return ListTile(
              leading: CircleAvatar(
                backgroundImage: ExactAssetImage(seasideList[index].image),
              ),
              title: Text("${seasideList[index].name}"),
              subtitle: Text("${seasideList[index].details}"),
              onTap: () {
                 //Tapping on listItem navigates to PageDetails
                _navigateToPageDetails(context, seasideList[index]);
              },
            );
          }),
    );
  }

  //Launches PageDetails and awaits the results from Navigator.pop() called from PageDetails.
  _navigateToPageDetails(BuildContext context, Item item) async {

    //Holds the results returned from PageDetails.
    final resultFromPageDetails;

    //TODO: Navigation implementations are discussed in upcoming Navigation section of this article

    //snackbars is used to display the result returned from another page.
    //Hide any previous snackbars and show the new resultFromPageDetails.
    Scaffold.of(context)
      ..removeCurrentSnackBar()
      ..showSnackBar(SnackBar(content: Text("$resultFromPageDetails")));
  }
}
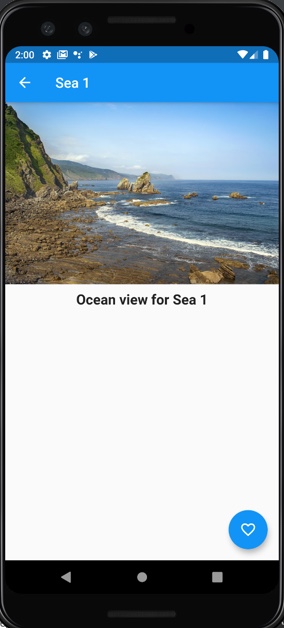
PageDetails Screen
This page displays details for the homepage's list items. It's a simple page displaying item's image, details and its name in appBar. It has a FloatingActionButton or FAB in the bottom-right corner. Clicking on this navigates back to home page with a message that the item is marked as favorite. This is used to demonstrate passing data from detailed page back to homepage.
The PageDetails implementation:
class PageDetails extends StatelessWidget {
  final Item item;

  const PageDetails({Key key, this.item}) : super(key: key);

  @override
  Widget build(BuildContext context) {
    return Scaffold(
      appBar: AppBar(
        title: Text(item.name),
      ),
      body: Column(
        children: [
          Image.asset(item.image),
          SizedBox(
            height: 10,
          ),
          Text(
            item.details,
            style: TextStyle(fontWeight: FontWeight.bold, fontSize: 20),
          ),
        ],
      ),
      floatingActionButton: FloatingActionButton(
        child: Icon(Icons.favorite_border),
        onPressed: () {
          //Current item's name along with message is sent back to last screen
          Navigator.pop(context, '${item.name} is marked as favorite.');
        },
      ),
    );
  }
}
Item
The Item is a data model to represent each row in homepage's list.
class Item {
  final String name;
  final String image;
  final String details;
  Item({this.name, this.image, this.details});
}
Navigation
There are three ways to create navigation in Flutter:
-
Direct Navigation: Direct navigation is implemented with MaterialPageRoute. This is also known as un-named routing.
-
Static Navigation: Static navigation is implemented by assigning a map of routes to MaterialApp's
routesproperty. The route name is pushed usingNavigator.pushNamed(...). This is known as Named Routing. -
Dynamic Navigation: In this navigation, routes are generated by implementing
onGenerateRoutecallback in theMaterialAppclass. This is a type of Named Routing as well, and the route name is pushed usingNavigator.pushNamed(...).
Let's go ahead and check out navigation implementations.
Direct Navigation
Direct navigation is also known as un-named routing. It is implemented with MaterialPageRoute. The MaterialPageRoutes is pushed directly to the navigator. This approach contributes to boilerplate code which multiplies with growing screens/pages. It is very hard to keep track of logic around these routes since its spread out in multiple classes.
Entry point:
The MaterialApp assigns PageListing screen as its home property.
//Using Direct Navigation (un-named routing)
void main() => runApp(
      MaterialApp(
        debugShowCheckedModeBanner: false,
        home: PageListing(),
      ),
    );
Navigation Implementation:
The Navigator.push is used to implement this routing. The MaterialPageRoute is pushed on the Navigator. The Navigator is a widget that manages a set of child widgets as a stack. These child widgets are pages/screens pushed on the Navigator. Navigator refers to these children as Route object.
Sending Data:
The MaterialPageRoute uses builder to build the primary contents of the route (page/screen). The Item object is passed as argument to PageDetails widget.
MaterialPageRoute(
  builder: (context) => PageDetails(
    item: item,
  ),
),
Receiving Data:
The Navigator.push returns a Future that completes after calling Navigator.pop on the PageDetails Screen.
_navigateToPageDetails(...):
The _navigateToPageDetails(...) is called on tapping a list item. The PageDetails route is pushed on the Navigator. The Navigator.push returns a Future which contains the data sent back from Navigator.pop in PageDetails widget. This data is stored in resultFromPageDetails variable, and displayed in a SnackBar widget
class PageListing extends StatelessWidget {

  ...

  //Launches PageDetails and awaits the results from Navigator.pop() called from PageDetails.
  _navigateToPageDetails(BuildContext context, Item item) async {

    //Navigation implementations are different for each part.
    //Part#1. Un-named
    final resultFromPageDetails = await Navigator.push(
      context,
      MaterialPageRoute(
        builder: (context) => PageDetails(
          item: item,
        ),
      ),
    );

    //snackbars is used to display the result returned from another page.
    //Hide any previous snackbars and show the new resultFromPageDetails.
    Scaffold.of(context)
      ..removeCurrentSnackBar()
      ..showSnackBar(SnackBar(content: Text("$resultFromPageDetails")));
  }
}
Static Navigation
The static navigation is implemented by assigning a Map of routes (pages/screens) to MaterialApp's routes property. The route name is pushed using Navigator.pushNamed(...). This is known as Named Routing because each page is given a unique name, which is pushed on Naviagtor widget.
The MaterialApp and WidgetApp provides the routes property. This property allows to specify routes in Map<String, WidgetBuilder>.
This option is great when there is no logic around the routes. For example, authentication or verification before you show the page. Only the data available global to app can be passed on to the second page.

Entry point:
In this application, there are two ways to assign the initial page, PageListing(). One way is to assign PageListing() widget to home property. Another ways is to assign a Map containing </, PageListing()> entry to routes property. The / represents the home page mapping.
//Using Static Navigation
void main() => runApp(
      MaterialApp(
        debugShowCheckedModeBanner: false,
        //home: PageListing(),
        //Part#2. Named route using Map
        routes: <String, WidgetBuilder>{
          '/': (BuildContext context) => PageListing(),
          '/details': (BuildContext context) => PageDetails(
                item: seasideList[0],
              ),
        },
      ),
    );
Navigation Implementation:
All routes/pages have entries in routes table above. The Map entry '</details, PageDetails()>' is added to navigate to the PageDetails page. The /details is the alias/name to the PageDetails page. This name is pushed on the Naviagtor widget using Naviagtor.pushNamed.
Navigator.pushNamed(context, '/details')
Sending Data:
The data can be passed to the PageDetails at the top-level only where the routes are assigned to routes property. In this case, only globally available data can be passed. In this implementation, only first item seasideList[0] detail page will open for any selection on the homepage.
routes: <String, WidgetBuilder>{
  '/': (BuildContext context) => PageListing(),
  '/details': (BuildContext context) => PageDetails(
        item: seasideList[0],
      ),
},
Receiving Data:
The Navigator.push returns a Future that completes after calling Navigator.pop on the PageDetails Screen. This is similar to what we discussed earlier.
_navigateToPageDetails(...):
This is similar to what we discussed earlier except Navigator.pushNamed is used for pushing the routes on the stack.
class PageListing extends StatelessWidget {

  ...

  //Launches PageDetails and awaits the results from Navigator.pop() called from PageDetails.
  _navigateToPageDetails(BuildContext context, Item item) async {

    //Navigation implementations are different for each part.
    //Part#2. Named route with Maps
    final result = await Navigator.pushNamed(context, '/details');

    //snackbars is used to display the result returned from another page.
    //Hide any previous snackbars and show the new resultFromPageDetails.
    Scaffold.of(context)
      ..removeCurrentSnackBar()
      ..showSnackBar(SnackBar(content: Text("$result")));
  }
}
Dynamic Navigation
In dynamic navigation, routes are generated by implementing onGenerateRoute callback in the MaterialApp class. This is a type of Named Routing that makes use of onGenerateRoute property.
The MaterialApp and WidgetApp provides the onGenerateRoute property. It lets you specify a function, say generateRoute returning a route. It allows the data pass using RouteSettings. It carries the data that might be useful in constructing a Route.
Any verification logic can be easily be applied before showing the target page. There's always an option to default "not found" page when route or match is not found.
Entry point:
The entry page PageListing is assigned to home property. The initialRoute property can be used to assign the beginning route/page. The generateRoute callback function handles the navigational logic.
//Using Dynamic Navigation
void main() => runApp(
      MaterialApp(
        debugShowCheckedModeBanner: false,
        home: PageListing(),
        //Part#3. Named with onGenerateRoute
        initialRoute: '/',
        onGenerateRoute: generateRoute,
      ),
    );
Navigation Implementation:
The Navigator use Route object to represent the page/screen. The generateRoute() function returns the appropriate route based on the matching name. The RouteSettings is useful in passing around these route names and arguments, if any. The route name is extracted using routeSettings.name. The arguments can be extracted using routeSettings.arguments. When no match is found, a common default page is shown to user displaying the appropriate message.
Route<dynamic> generateRoute(RouteSettings routeSettings) {
  final args = routeSettings.arguments;

  switch (routeSettings.name) {
    case '/':
      return MaterialPageRoute(
        builder: (context) => PageListing(),
      );

    case '/details':
      if (args is Item) {
        return MaterialPageRoute(
          builder: (context) => PageDetails(
            item: args,
          ),
        );
      }

      return MaterialPageRoute(
        builder: (context) => PageNotFound(),
      );

    default:
      return MaterialPageRoute(
        builder: (context) => PageNotFound(),
      );
  }
}
Sending Data:
This is similar to the last Named Routing approach. In this approach, we can pass item as arguments. This arguments is extracted and passed to the PageDetails widget in generateRoute routing function.
Navigator.pushNamed(
      context,
      '/details',
      arguments: item,
    )
Receiving Data:
The Navigator.push returns a Future that completes after calling Navigator.pop on the PageDetails Screen. This is similar to what we discussed earlier.
_navigateToPageDetails(...):
This is similar to what we discussed earlier except Navigator.pushNamed is used to pass the data along in addition to pushing the named routes on the stack.
class PageListing extends StatelessWidget {

  ...

  //Launches PageDetails and awaits the results from Navigator.pop() called from PageDetails.
  _navigateToPageDetails(BuildContext context, Item item) async {
    //Navigation implementations are different for each part.
    //Part#3. Named route using callback function
    final result = await Navigator.pushNamed(
      context,
      '/details',
      arguments: item,
    );

    //snackbars is used to display the result returned from another page.
    //Hide any previous snackbars and show the new resultFromPageDetails.
    Scaffold.of(context)
      ..removeCurrentSnackBar()
      ..showSnackBar(SnackBar(content: Text("$result")));
  }
}
PageNotFound:
class PageNotFound extends StatelessWidget {
  @override
  Widget build(BuildContext context) {
    return Scaffold(
      appBar: AppBar(
        title: Text("Page not found"),
      ),
      body: Center(
        child: Text("Page is not available."),
      ),
    );
  }
}
Source Code Repo
-
Source code for Direct Navigation (Un-Named Routing) is available here
-
Source code for Static Navigation (Named Routing with Map) is available here
-
Source code for Dynamic Navigation (Named Routing with callback function) is available here
-
Flutter Cookbook project's source code is available here
References
Happy cooking with Flutter :)
Liked the article? Couldn't find a topic of your interest? Please leave comments or email me about topics you would like me to write! BTW I love cupcakes and coffee both :)
Follow me at twitter