Flutter code recipe for AppBar widget
Posted on February 02, 2019 in Flutter
AppBar
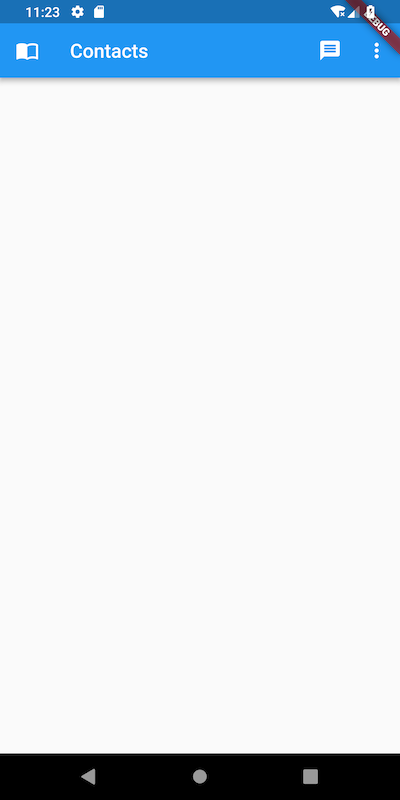
AppBar widget is the main widget in any Android app. It sits at the top of the application, and mostly controls major action items. In today's recipe, I'll show you how to design an AppBar for a phonebook style app. The AppBar will have a phonebook icon, a title saying 'Contacts' and action items in AppBar's always on area as well as in overflow area.
Target Audience: Beginner
Recipe: Implement a basic appBar with a title, actions, and an overflow dropdown menu.
Focus Widget: AppBar
Goal: AppBar displays an icon, title, action and overflow menu items. Clicking on action/overflow menu items displays status message.
Lets's go!
Step #1. Create AppBar inside Scaffold. backgroundColor is used for setting background color of the AppBar
return Scaffold(
      appBar: AppBar(
        backgroundColor: Colors.blue,
        ...
      ),
    );
Step #2. Add image Icon using leading attribute
return Scaffold(
      appBar: AppBar(
        ...
        leading: Icon(Icons.import_contacts),
        ...
      ),
    );
Step #3. Add AppBar's title
return Scaffold(
      appBar: AppBar(
        ...
        title: Text("Contacts"),
        ...
      ),
    );
Step #4. Add IconButton action item to send message.
return Scaffold(
      appBar: AppBar(
        ...
        actions: <Widget>[
          IconButton(
            icon: Icon(Icons.message),
            onPressed: () {
              clicked(context, "Message sent");
            },
          ),
        ],
      ),
    );
Step #5. Add overflow action item using PopupMenuButton
return Scaffold(
      appBar: AppBar(
        ...
        actions: <Widget>[
          ...
          PopupMenuButton(
            itemBuilder: (BuildContext context) {
              return [
                PopupMenuItem(child: IconButton(
                  icon: Icon(Icons.email),
                  onPressed: () {
                   clicked(context, "Email sent");
                  },
                ),),
              ];
            },
          )
        ],
      ),
    );
Step #6. Handle action item clicks
void clicked(BuildContext context, menu) {
    final scaffold = Scaffold.of(context);
    scaffold.showSnackBar(
      SnackBar(
        content: Text(menu),
        action: SnackBarAction(
            label: 'UNDO',
            onPressed: scaffold.hideCurrentSnackBar),
      ),
    );
}
Complete example code
import 'package:flutter/material.dart';

void main() => runApp(MyApp());

class MyApp extends StatelessWidget {
  @override
  Widget build(BuildContext context) {
    return MaterialApp(
      title: 'Flutter Basic Appbar Demo',
      theme: ThemeData(
        primarySwatch: Colors.blue,
      ),
      home: BasicAppbarRecipe(title: 'Basic Appbar'),
    );
  }
}

class BasicAppbarRecipe extends StatefulWidget {
  BasicAppbarRecipe({Key key, this.title}) : super(key: key);

  final String title;

  @override
  _BasicAppbarRecipeState createState() => _BasicAppbarRecipeState();
}

class _BasicAppbarRecipeState extends State<BasicAppbarRecipe> {

  @override
  Widget build(BuildContext context) {
    return Scaffold(
      appBar: AppBar(
        backgroundColor: Colors.blue,
        //setting the icon for the AppBar
        leading: Icon(Icons.import_contacts),
        //setting title for the AppBar
        title: Text("Contacts"),
        actions: <Widget>[
          //Setting IconButton action item to send message
          IconButton(
            icon: Icon(Icons.message),
            onPressed: () {
              //Handling click on the action items
              clicked(context, "Message sent");
            },
          ),
          //Setting Overflow action items using PopupMenuButton
          PopupMenuButton(
            itemBuilder: (BuildContext context) {
              return [
                PopupMenuItem(child: IconButton(
                  icon: Icon(Icons.email),
                  onPressed: () {
                    clicked(context, "Email sent");
                  },
                ),),
              ];
            },
          )
        ],
      ),
    );
  }

  void clicked(BuildContext context, menu) {
    final scaffold = Scaffold.of(context);
    scaffold.showSnackBar(
      SnackBar(
        content: Text(menu),
        action: SnackBarAction(
            label: 'UNDO',
            onPressed: scaffold.hideCurrentSnackBar),
      ),
    );
  }
}
Source code repo: Recipe source code is available here
References:
- https://docs.flutter.io/flutter/material/AppBar-class.html
Happy cooking with Flutter :)
Liked the article ? Couldn't find a topic of your interest ? Please leave comments or email me about topics you would like me to write ! BTW I love cupcakes and coffee both :)