Designing Cross platform Flutter prototype for Landing Page (Web-Hummingbird, Android, iOS)
Posted on June 03, 2019 in Flutter
Introduction
This post is about how to design landing page for a hypothetical mobile and web app for Flutter resources say "Flutter-to-Fly !". This post will have two sections to it:
-
Flutter-to-fly landing page for Web (
webbranch of source code). -
Flutter-to-fly landing page for Native Android and iOS platforms (
nativebranch of source code).
Checkout the companion video tutorial Part - 1:
Checkout the companion video tutorial Part - 2:
Part-1: Flutter-to-fly landing page for Web
Note: As of now (June 3rd, 2019), there's no actually one code base solution exists for cross-platform Flutter. Web app's code uses specific web libraries. Plug-ins used in flutter native apps can't be used in web apps. Its recommended to create a git branch to host web app code for now until web comes out of tech-preview and experimentation.
Setup:
-
Create a Flutter Project in Android Studio.
-
Create a git branch
web -
Copy
pubspec.yamltopubspec.yaml.nativefor backing up native platform settings. We would need this for native project in another branch saymaster. I would keep native code in default branchmaster.
Configuring pubspec.yaml:
Adapt pubspec.yaml for Web as described in this link. This is how pubspec.yaml for web app will look like:
name: landingpage
description: Cross platform sample landing page implemented in Flutter

version: 1.0.0+1

dependencies:
  flutter_web: any

dev_dependencies:
  flutter_web_test: any
  #dependencies to enable the Dart web build system
  build_runner: ^1.2.2
  build_web_compilers: ^1.1.0
  test: ^1.3.4

  ## These overrides tell the package tools to get them from GitHub
dependency_overrides:
  flutter_web:
    git:
      url: https://github.com/flutter/flutter_web
      path: packages/flutter_web
  flutter_web_ui:
    git:
      url: https://github.com/flutter/flutter_web
      path: packages/flutter_web_ui
  flutter_web_test:
    git:
      url: https://github.com/flutter/flutter_web
      path: packages/flutter_web_test
Create web directory:
Create a web directory to host the entry point for the web app at root level (same level as lib directory). web/index.html and web/main.dart needs to be added as mentioned here
Building web app: Navigate to current working directory and get all dependencies.
cd landingpage
pub get
Dart uses webdev to build and run project. Make sure to activate webdev before building project like below. Don't forget to include it in system PATH using export PATH="$PATH":"$HOME/.pub-cache/bin" after activation.
pub global activate webdev
webdev serve
Web app will start running at localhost port 8080
Note: Make sure that you've replaced all package:flutter packages with package:flutter_web variant.
At this point, we're done with setting up Flutter project to start building web app. You'll see default counter app running, provided as part of built-in examples.
Step1: Getting ready & Page Header
Clean up the pre-generated code by Flutter. Make MyHomePage Stateless widget. Remove the title passed into MyHomePage. Update the title of the app to Flutter to fly !.
This is how your main.dart should look like:
import 'package:flutter_web/material.dart';

void main() => runApp(MyApp());

class MyApp extends StatelessWidget {
  // This widget is the root of your application.
  @override
  Widget build(BuildContext context) {
    return MaterialApp(
      title: 'Flutter to fly !',
      theme: ThemeData(
        primarySwatch: Colors.blue,
      ),
      home: MyHomePage(),
    );
  }
}

class MyHomePage extends StatelessWidget {
  @override
  Widget build(BuildContext context) {
    // TODO: implement build
    return null;
  }

}
Now, lets add header and body for the landing page. Header will have site's logo and navigation links. Body will have background image, text box to submit emails to subscribe to mailing list for any content updates.
First, add a linear gradient on the whole page using two different shades of white (I created a class MyColors.dart to hold all my custom colors).
@override
  Widget build(BuildContext context) {
    //Add a container and provide a linear gradient.
    //basically use different shades of same color.
    return Container(
      decoration: BoxDecoration(
          gradient: LinearGradient(colors: [MyColors.white1, MyColors.white2])),
    );
  }
Add a Scaffold as child to Container above to hold the whole page like below:
class MyHomePage extends StatelessWidget {
  @override
  Widget build(BuildContext context) {
    //Add a container and provide a linear gradient.
    //basically use different shades of same color.
    return Container(
      decoration: BoxDecoration(
          gradient: LinearGradient(colors: [MyColors.white1, MyColors.white2])),
      child: Scaffold(
        backgroundColor: Colors.transparent,
        body: SingleChildScrollView(
          child: Column(
            children: <Widget>[Header(), Body()],
          ),
        ),
      ),
    );
  }
}
SingleChildScrollView will contain header and body of the page. I've created two classes: Header and Body to help us with header and body section/widgets.
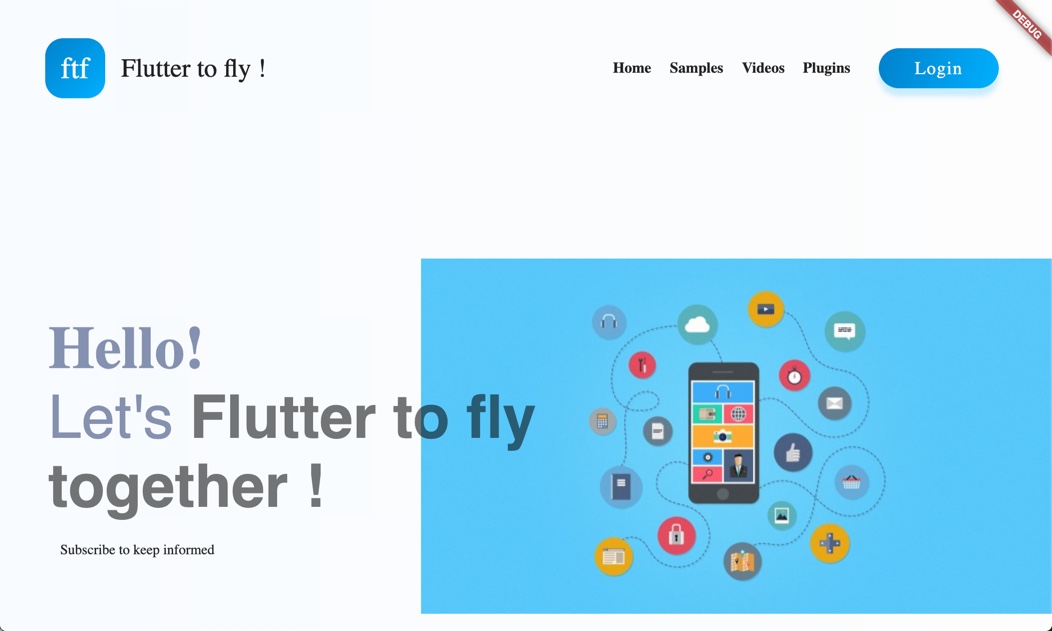
Header Widget
Header section/widget contains logo and site's title at left side, and navigation links and login button at right side.
I'll use Padding widget to contain header section's logo and links.
![]()
Below is the code snippet that's responsible for generating logo above:
//Builds rectangle with circular corners and Text on it and next to it as title
Widget buildLogo() {
  return Row(
    children: <Widget>[
      Container(
        width: 60,
        height: 60,
        decoration: BoxDecoration(
          borderRadius: BorderRadius.circular(18),
          gradient: LinearGradient(colors: [MyColors.blue1, MyColors.blue2],
          begin: Alignment.bottomRight, end: Alignment.topLeft),
        ),
        child: Center(
          child: Text(Strings.logoTitle,
          style: TextStyle(fontSize: 30, color: MyColors.white1),),
        ),
      ),
      //give some space between logo box and title
      SizedBox(
        width: 16,
      ),
      Text(Strings.appTitle, style: TextStyle(fontSize: 26),)
    ],
  );
}
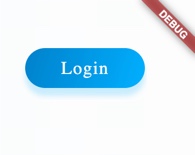
LogIn Button:
//Builds and decorates login button
Widget buildLoginButton() {
  return Padding(
    padding: EdgeInsets.all(8.0),
    child: InkWell(
      child: Container(
        margin: EdgeInsets.only(left: 20),
        width: 120,
        height: 40,
        decoration: BoxDecoration(
          gradient: LinearGradient(colors: [
            MyColors.blue1, MyColors.blue2
          ],
          begin: Alignment.bottomRight,
          end: Alignment.topLeft),
          borderRadius: BorderRadius.circular(20),
          boxShadow: [
            BoxShadow(
              color: MyColors.blue3.withOpacity(0.3),
              offset: Offset(0, 8), //Shadow starts at x=0, y=8
              blurRadius: 8
            )
          ]
        ),
        child: Material(
          color: Colors.transparent,
          child: Center(
            child: Text(Strings.loginButton,
            style: TextStyle(
              color: MyColors.white1,
              fontSize: 18,
              letterSpacing: 1
            ),),
          ),
        ),
      ),
    ),
  );
}
Header Navigation Links: Now add header navigation links just before the login button created above to finish header section.
Get the list of links to be shown in the header:
//Builds navigation list for header
List<Widget> getLinksListing() {
  var links = ["Home", "Samples", "Videos", "Plugins"];
  return links.map((link) {
    return Padding(
      padding: EdgeInsets.only(left: 18),
      child: Text(
        link,
        style: TextStyle(fontSize: 15, fontWeight: FontWeight.bold),
      ),
    );
  }).toList();
}
Add links listing to Header:
//Builds navigation links at the right top of landing page
Widget buildHeaderLinks() {
  return Row(
    mainAxisAlignment: MainAxisAlignment.spaceAround,
    children: getLinksListing()..add(buildLoginButton()),
  );
}
Finally, build header widget:
@override
Widget build(BuildContext context) {
  return Padding(
    padding: EdgeInsets.symmetric(horizontal: 45, vertical: 38),
    child: buildHeader(),
  );
}

Widget buildHeader() {
  return Row(
    mainAxisAlignment: MainAxisAlignment.spaceBetween,
    children: <Widget>[buildLogo(), buildHeaderLinks()],
  );
}
This is how header looks at this point:

We're done with header for now. Let's move to body section in Step2.
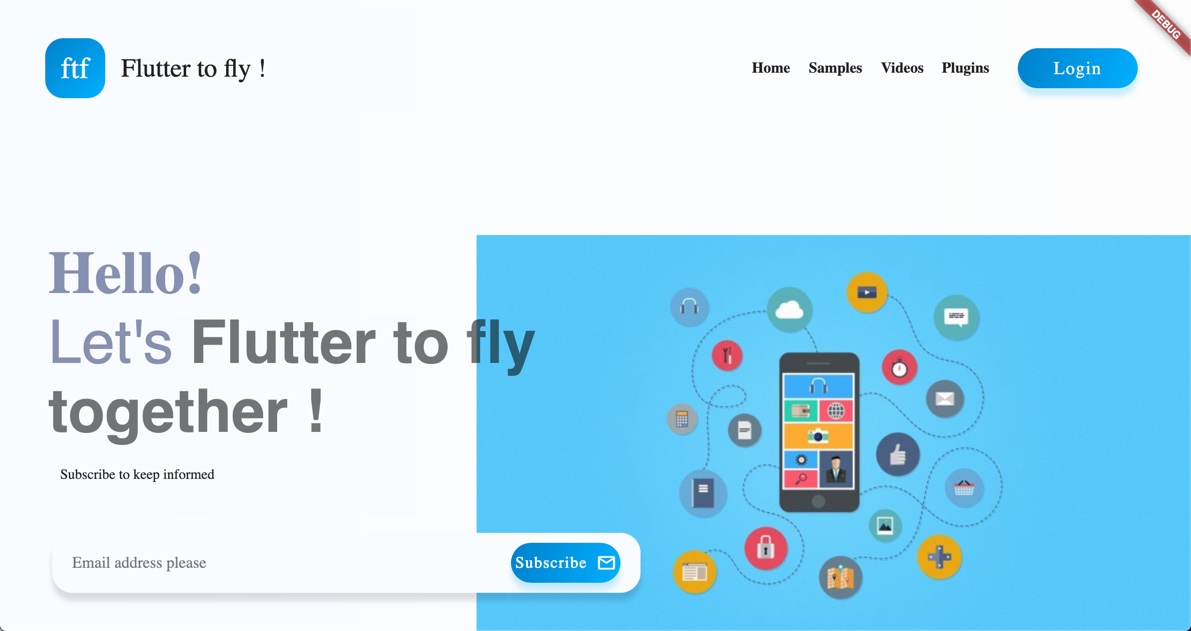
Step2: Page Body:
Body section has three components to it. * Background image showing flutter art work. * Welcome text. * Mailing list subscription: Text box to let user enter their email addresses to subscribe to the newsletter.
Adding Background image:
All images goes inside web/assets directory. Background image is added aligned to right side of the page.
//Adds background Image
Widget addBackground() {
  return FractionallySizedBox(
    alignment: Alignment.centerRight, //to keep images aligned to right
    widthFactor: .6, //covers about 60% of the screen width
    child: Image.network(backgroundImage, scale: .85,),
  );
}
Let's work on welcome text title.
Adding Welcome Text:
I've added welcome text at this point, and it looks like below:
//Adds welcome text
Widget addWelcomeText() {
  return FractionallySizedBox(
    alignment: Alignment.centerLeft, //text aligned to left side
    widthFactor: .6, //covers about half of the screen
    child: Padding(
      padding: EdgeInsets.only(left: 48),
      child: Column(
        crossAxisAlignment: CrossAxisAlignment.start,
        mainAxisAlignment: MainAxisAlignment.center,
        children: <Widget>[
          Text(
            Strings.hello,
            style: TextStyle(
              fontWeight: FontWeight.bold,
              fontSize: 60,
              color: MyColors.blue4,
            ),
          ),
          RichText(
            text: TextSpan(
              text: Strings.welcomeTo,
              style: TextStyle(
                fontSize: 60,
                color: MyColors.blue4
              ),
              children: [
                TextSpan(
                  text: Strings.ftf,
                  style: TextStyle(
                    fontSize: 60,
                    fontWeight: FontWeight.bold,
                    color: Colors.black54
                  )
                )
              ]
            ),
          ),
          Padding(
            padding: EdgeInsets.only(left: 12.0, top: 20),
            child: Text(Strings.subscribeText),
          ),
          SizedBox(height: 40,), //Give some spacing
          EmailBox() //Alert : this will be added after next step
        ],
      ),
    ),
  );
}
Let's work on the third part of the body section: users inputting their email addresses in text box to subscribe to site.
Mailing list subscription:
There're two parts to this component. One is text box for user to enter email addresses. Let's call this widget EmailBox. Another is button to click on to subscribe. I'm naming this widget as SubscribeButton
Here's how EmailBox code looks like:
class EmailBox extends StatelessWidget {
  @override
  Widget build(BuildContext context) {
    return Padding(
      padding: EdgeInsets.only(left: 4.0, right: 74, top: 10, bottom: 40),
      child: Container(
        height: 60,
        decoration: BoxDecoration(
            color: MyColors.white1,
            borderRadius: BorderRadius.circular(20),
            boxShadow: [
              BoxShadow(
                  color: Colors.black12, offset: Offset(0, 8), blurRadius: 8)
            ]),
        child: Padding(
          padding: EdgeInsets.symmetric(horizontal: 20),
          child: Row(
            mainAxisAlignment: MainAxisAlignment.spaceBetween,
            children: <Widget>[
              Expanded(
                flex: 8,
                child: TextField(
                  decoration: InputDecoration(
                      border: InputBorder.none, hintText: Strings.email_hint),
                ),
              ),
              Expanded(
                flex: 2,
                child: SubscribeButton(),
              )
            ],
          ),
        ),
      ),
    );
  }
}
SubscribeButton is called from EmailBox. SubscribeButton widget looks like below:
import 'package:flutter_web/material.dart';
import 'package:landingpage/utils/myColors.dart';
import 'package:landingpage/utils/strings.dart';

class SubscribeButton extends StatelessWidget {
  var emailImage = "assets/email.png";

  @override
  Widget build(BuildContext context) {
    return InkWell(
      child: Container(
        height: 40,
        decoration: BoxDecoration(
            gradient: LinearGradient(
                colors: [MyColors.blue1, MyColors.blue2],
                begin: Alignment.bottomRight,
                end: Alignment.topLeft),
            borderRadius: BorderRadius.circular(20.0),
            boxShadow: [
              BoxShadow(
                  color: MyColors.blue3.withOpacity(.3),
                  offset: Offset(0, 8),
                  blurRadius: 8.0)
            ]),
        child: Material(
          color: Colors.transparent,
          child: InkWell(
            onTap: () {}, //TODO
            child: Center(
              child: Row(
                mainAxisAlignment: MainAxisAlignment.center,
                children: <Widget>[
                  Text(
                    Strings.subscribeButton,
                    style: TextStyle(
                        color: MyColors.white1, fontSize: 16, letterSpacing: 1),
                  ),
                  SizedBox(
                    width: 8,
                  ),
                  Image.network(
                    emailImage,
                    color: MyColors.white1,
                    width: 20,
                    height: 20,
                  )
                ],
              ),
            ),
          ),
        ),
      ),
    );
  }
}
The final landing page looks like this:
Checkout my article about making this page responsive
Part-2: Flutter-to-fly landing page for Native platform
I want to show you how this code can be converted into native, and can be built and run on Android and iOS platforms.
First we need to create a separate branch and adapt its pubspec.yaml for native Flutter. Remember that you can use any plug-ins in native code, but not in web variation at this point. So, it makes sense to create web app first and then adapt it at native platform.
As I mentioned before that you would need to replace flutter_web to flutter packages.
Note: You may need to refresh packages in native environment. Don't forget to update the assets in appropriate location for Flutter native.
I've created branch named native to play around in Android and iOS platforms. At this point, I see few dimensions issues there since layout is designed for large screen point of view. In next post, I'll explain how we can make it responsive on different form factors.
Until then keep Fluttering !
Source code repo:
Next Article: Make landing page responsive
References/Credits:
- Migration to Web
- I've adapted design of "Flutter-to-fly" hypothetical app's landing page from this dribble design
- Adapted this web app example to Native Flutter platforms to demonstrate Flutter's cross-platform support.
Happy cooking with Flutter :)
Liked the article ? Couldn't find a topic of your interest ? Please leave comments or email me about topics you would like me to write ! BTW I love cupcakes and coffee both :)