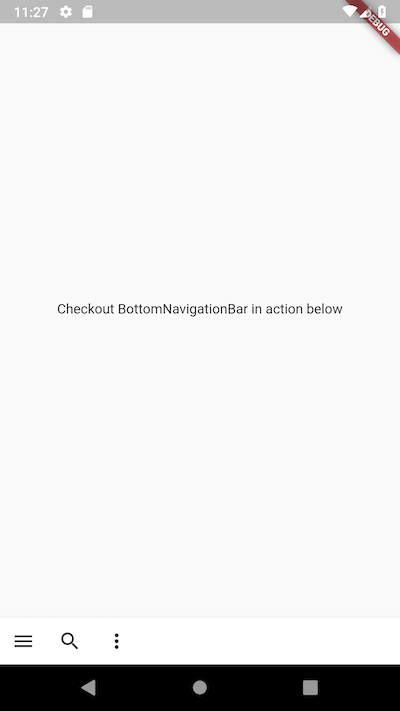
BottomNavigationBar with menu, search and overflow action items
Posted on February 05, 2019 in Flutter
BottomNavigationBar
BottomNavigationBar is used to put action menus at the bottom of a Flutter app. This widget is useful to put actions menus intended for the current page. This recipe will show how to implement a bottom navigation bar with a menu to open drawer for more action items like "add" & "edit", a "search" menu action and finally an overflow menu action item.
Target Audience: Beginner
Recipe: Implement a BottomNavigationBar using BottomAppBar with menu, search and overflow action items.
Focus Widget: BottomAppBar
Goal: BottomNavigationBar displays a menu to bring up bottom navigation drawer, a dummy search action icon and overflow action items menu. Clicking on each menu action will display a message using Fluttertoast

Checkout in action:
Lets's go!
Step #1. Since we'll be using fluttertoast for showing status messages, first we'll be adding
fluttertoast library dependency in pubspec.yaml like below:
dependencies:
  flutter:
    sdk: flutter
  #added fluttertoast library to show status messages
  fluttertoast: ^2.1.0
Click on get/upgrade dependencies when prompt is shown. You may want to make sure that all dependencies are refreshed.
Step #2. Add a placeholder top part for the app using Center widget.
I'll be using Text widget to show demo message.
Widget build(BuildContext context) {
    return Scaffold(
      body: Center(
        child: Text('Checkout BottomNavigationBar in action below'),
      ),
    ...

    );
  }
Step #3. Add BottomAppBar widget using bottomNavigationBar attribute.
  @override
  Widget build(BuildContext context) {
    return Scaffold(
      ...

      bottomNavigationBar: BottomAppBar(
          ...
    );
  }
Step #4. Add child component Row to BottomAppBar.
  @override
  Widget build(BuildContext context) {
    return Scaffold(
      ...

      bottomNavigationBar: BottomAppBar(
        child: Row(

        ),
          ...
    );
  }
Step #5. Now, its time to add menu action widgets. Widgets are added as children to Row component.
  @override
  Widget build(BuildContext context) {
    return Scaffold(
      ...

      bottomNavigationBar: BottomAppBar(
        child: Row(
            children: <Widget>[
                ...
            ],
        ),
          ...
    );
  }
Step #6. Next, I'll add our very first menu action item as first child menu action widget.
I'll be using IconButton widget. When this action menu is clicked, it'll open ModalBottomSheet.
  @override
  Widget build(BuildContext context) {
    return Scaffold(
      ...

      bottomNavigationBar: BottomAppBar(
        child: Row(
            children: <Widget>[
                // Bottom that pops up from the bottom of the screen.
                IconButton(
                    icon: Icon(Icons.menu),
                    onPressed: () {
                      showModalBottomSheet<Null>(
                        context: context,
                        builder: (BuildContext context) => openBottomDrawer(),
                      );
                    },
                ),
            ],
        ),
          ...
    );
  }
Drawer opened in modal bottom sheet has two menu actions for "Edit" and "Add". It looks like this:
Widget openBottomDrawer() {
    return Drawer(
      child: Column(
        children: const <Widget>[
          //Add menu item to edit
          const ListTile(
            leading: const Icon(Icons.mode_edit),
            title: const Text('Edit'),
          ),
          const ListTile(
            //Add menu item to add a new item
            leading: const Icon(Icons.add),
            title: const Text('Add'),
          ),
        ],
      ),
    );
  }
Step #7. Two more IconButton widgets are added for "Search" and overflow menu action items as children widgets.
  @override
  Widget build(BuildContext context) {
    return Scaffold(
      ...

      bottomNavigationBar: BottomAppBar(
        child: Row(
            children: <Widget>[
                //First action menu widget
                // Bottom that pops up from the bottom of the screen.
                IconButton(
                    icon: Icon(Icons.menu),
                    onPressed: () {
                      showModalBottomSheet<Null>(
                        context: context,
                        builder: (BuildContext context) => openBottomDrawer(),
                      );
                    },
                ),

                //Second action menu widget for Search
                IconButton(
                    icon: Icon(Icons.search),
                    onPressed: () {
                      Fluttertoast.showToast(msg: 'Clicked on Search menu action.');
                    },
                ),

                //Third action menu widget for overflow action
                IconButton(
                    icon: const Icon(Icons.more_vert),
                    onPressed: () {
                      Fluttertoast.showToast(msg: 'This is where overflow menu actions will go');
                    },
                ),
            ],
        ),
    );
  }
Complete example code
import 'package:flutter/material.dart';
import 'package:fluttertoast/fluttertoast.dart';

void main() => runApp(MyApp());

class MyApp extends StatelessWidget {
  // This widget is the root of your application.
  @override
  Widget build(BuildContext context) {
    return MaterialApp(
      title: 'BottomNavigationBarRecipe',
      theme: ThemeData(
        primarySwatch: Colors.blue,
      ),
      home: BottomNavigationBarRecipe(title: 'Flutter Demo Home Page'),
    );
  }
}

class BottomNavigationBarRecipe extends StatefulWidget {
  BottomNavigationBarRecipe({Key key, this.title}) : super(key: key);

  final String title;

  @override
  _BottomNavigationBarRecipeState createState() => _BottomNavigationBarRecipeState();
}

class _BottomNavigationBarRecipeState extends State<BottomNavigationBarRecipe> {

  @override
  Widget build(BuildContext context) {
    return Scaffold(
      body: Center(
        child: Text('Checkout BottomNavigationBar in action below'),
      ),
      bottomNavigationBar: BottomAppBar(
          child: Row(
            children: <Widget>[
              // Bottom that pops up from the bottom of the screen.
              IconButton(
                icon: Icon(Icons.menu),
                onPressed: () {
                  showModalBottomSheet<Null>(
                    context: context,
                    builder: (BuildContext context) => openBottomDrawer(),
                  );
                },
              ),
              IconButton(
                icon: Icon(Icons.search),
                onPressed: () {
                  Fluttertoast.showToast(msg: 'Clicked on Search menu action.');
                },
              ),
              IconButton(
                icon: const Icon(Icons.more_vert),
                onPressed: () {
                  Fluttertoast.showToast(msg: 'This is where overflow menu actions will go');
                },
              ),
            ],
          )),
    );
  }

  //This drawer is opened in modal bottom sheet
  Widget openBottomDrawer() {
    return Drawer(
      child: Column(
        children: const <Widget>[
          //Add menu item to edit
          const ListTile(
            leading: const Icon(Icons.mode_edit),
            title: const Text('Edit'),
          ),
          const ListTile(
            //Add menu item to add a new item
            leading: const Icon(Icons.add),
            title: const Text('Add'),
          ),
        ],
      ),
    );
  }
}
Source code repo: Recipe source code is available here
References:
Happy cooking with Flutter :)
Liked the article ? Couldn't find a topic of your interest ? Please leave comments or email me about topics you would like me to write ! BTW I love cupcakes and coffee both :)